School of Rich Programmers: 7495.org School of Rich Programmers: 7495.org
This hands-on exercise demonstrates how smart contracts autonomously process state changes, calculate exchange rates, and execute multi-step transfers within a single transaction.
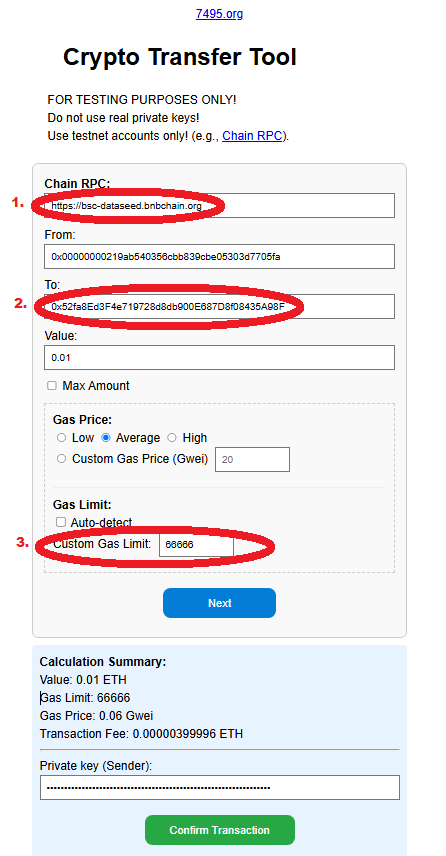
• Recommended Gas Limit: 66666 (Crucial: Standard peer-to-peer transfers use 21,000 gas. However, because this contract executes internal logic and triggers a secondary token transfer, it requires more computational power. Any unused gas will be automatically refunded to your wallet).
Ensure your Web3 wallet (e.g., MetaMask) is connected to your preferred network. For safety and testing purposes, we highly recommend starting with test networks (Ethereum Holesky or BSC Testnet) using free faucet coins.
Before sending funds, add the token to your wallet interface so you can see your new balance instantly:
1. Open your wallet and scroll down to "Import tokens" or "Custom Token".
2. Paste the Token Address: 0xB300F9D0A1D53E81be181495B324C65C839422e1
3. The token symbol and decimals should autofill. Confirm and click Add.
1. In your wallet, click Send.
2. Paste the Vendor Contract address in the recipient field: 0x52fa8Ed3F4e719728d8db900E687D8f08435A98F
3. Enter a micro-amount to safely test the contract mechanics (e.g., 0.001 or 0.01).
Before confirming the transaction, you must manually adjust the transaction parameters to avoid an "Out of Gas" error:
1. On the wallet confirmation screen, look for Gas Market / Advanced Settings (often hidden behind a gear or "Market" icon).
2. Locate the Gas Limit field (do not confuse this with Gas Price / Base Fee).
3. Change the value to 66666.
4. Confirm and broadcast the transaction to the blockchain.
Once the transaction is confirmed, you can verify its complete architecture by pasting your wallet address or the Vendor address into a blockchain explorer (Etherscan, Holesky Etherscan, or BscScan).
In the transaction details, you will observe the precise atomic nature of smart contracts:
• From: Your Address ➡️ To: Vendor Contract (Your native crypto transfer)
• From: Vendor Contract ➡️ To: Your Address (The automated 1:1,000 token delivery)